Pages

7.10.10

A trifle in shock.........

Peeping out of my hermitage for a moment to share happiness.

Pei Li had a wonderful give away over at her blog.  I was stunned to win and so excited because I love Pei Li's gentle style and the shabby chic style in general. 

Life has been a little under par of late so when a knock came on the door this morning it was a surprise to open the door and find there is a parcel for me!!   That changed the complexion of my day/week/month completely :)  With shaking hands I opened the envelope and then began the shock.........


This little pot of peonies is so perfect I can't believe my eyes.  Every petal is fine and translucent like real peonies.
Here they are displayed with some of the macarons I bought from Pei Li a while back.
The tiny pink pot is only 1centimetre across!


Thankyou so much Pei Li, your beautiful gift is such a pleasure to my soul.


26.8.10

Miniature Treasure!

Aren't these beautiful?


The nutella came from

The macarons in the beautiful jar from
who also included the pastries as a surprise :)
They are perfect in my modern kitchen.

I love buying special things sometimes, it seems like Christmas!

25.8.10

I love books!

I love Real Life books so of course miniature books hold a fascination too.


With thanks to
 Lize
and Ann Vanture at Paper Minis
For sharing their superb printies!!!

I enjoyed making these books so much, they all have pages inside, though some just have plain paper.

There should be some crochet to share in a few days :)

11.7.10

Toast anyone?..............

Levi needed a toaster so we made one.  School holidays are a specially busy miniature time round here!

Monkey see, monkey do, is me.  No imagination, but if I can touch it I can try making it.  I measured our RL toaster and we went from there.


Here is what you need.  Good old tongue depressors and coffee stirrers!  And a toaster to copy of course.


The upper part of the toaster with the slots was made as the three pieces shown bottom right, then all glued together.  Two tongue depressors glued together to get the thickness, split a coffee stirrer down the length to make the slot ends. Sand to shape.


The electric cord is made from thread with black card folded over and glued in position.  The wall plug was punched circles and the cord sandwiched between.  Tacky wax will hold it in position to make it look like it is plugged in.


Paint the upper and lower sections in your choice of colour and let dry.  Levi wanted Brushed Stainless Steel for his, mine is a retro/shabby green.  Glue top and bottom together and then add a timing knob made of a short length of toothpick.  Finally add the handle for lowering the toast.  We used black card again with a short piece of wire pushed into a drilled hole in the body of the toaster.


Addendum:- Second toaster makes its debut.


4.7.10

School Holiday Project

What Levi and I made for his modern kitchen roombox today.

We made it from a piece of a worn out Woolworths recyclable shopping bag like this RL one.


And here it is in his kitchen.

It was fun to make and it's the cutest thing to hold in your hand!

29.6.10

Georgie is FREEEEEEEEE!!


Please excuse my enthusiasm and delight :))


George had patella surgery 10 weeks ago, all did not go to plan, there was an accident to her knee tendon during the surgery.  We were told 3 to 6 months before she can be declared completely recovered.  She has spent 10 weeks in a play pen unless I could be with her to keep her immobile on a lead.  As you can imagine it hasn't been an easy time for the poor wee mite.Great surprise this morning!  The vet was so pleased with her this morning when she went for a check that he's allowing her to slowly integrate back into the family pack.

And here she is a few moments ago.  The fur is growing back and George is a happy girl!  Not that you can tell from the photo, she doesn't like cameras up close!

15.6.10

Little boxes, little boxes..............


If you remember that song you are older than my children.

No new crochet to show, I'm catching up on repeat items.  Time out needed so I played with paper again.

5.6.10

Paper Miniatures

Playing with paper.  Rewarding fun :)  The jugs come from  Marlies of course!  Thanks Marlies, they are fun to make.  The map is of the Sydney area, it's to go in a drawer in my 3rd grandsons kitchen roombox.  Grandson no.2 made the flowers, aged 12.

4.6.10

How to make a Laundry Sink


This laundry no longer exists as shown, sad story....... 

Because I can't easily buy any miniature supplies I printed the wallpaper myself and, after breaking my heart over it fading within weeks and having to be replaced 3 times, each time trying more desperate measures to prevent the fading, I gave in and threw the laundry box away.  The contents now live in a clear plastic chocolate box and the printie dryer and washer have been replaced with 'real' ones! 

Apart from the sad story, the reason for showing the laundry is to show the sink unit.  It's made from balsa, earring oddments and a cheese spread container.

2.6.10

Jam production


I saw Sabs beautiful jam jars and followed her link to Karins
tutorial.  Thankyou both for sharing!


31.5.10

Great Excitement!

A dear friend called in today with the most amazing gift for me. 
How lucky am I?  The luckiest person in the world!!
Thankyou Lidi!!!


Moon Shadow has "clothes"!!  He was a bit jealous when my grandsons horse got a saddle for Christmas ;)  Now he feels all smart!
Shadow is very proud of his new dressage saddle with double buckled girth and bridle with egg butt bit and cavesson, see him arching his neck and showing off for the camera.

The RL size horse shoe is a memento from the rear hoof of my beloved Thoroughbred - Black Prince - who I rode as a teenager a long time ago ;) 

Lidi recently was awarded IGMA Artisan status, she will be at Miniatura in October with her unique baskets.  Please visit her web shop and flickr photo album to see her wares.


25.5.10

Treasures


I made the tea trolley some time ago, the treasures came from Sydney Miniatures Show.  I didn't go to the show but a dear friend did!!

29.4.10

Recent fun and something special

When my daughter said she was going to make play dough for the kids I said why not make cold porcelain?  She has never been interested in miniatures but is very talented and I hoped she might enjoy "playing" with the porcelain dough too!  The results can be seen in the pictures below.


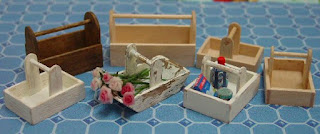
I'm proud to have some of the pink roses for my dollhouse!  I think they're very special.  The trugs and tool boxes were made with grandkids during school holidays.  No.2 grandson made the brown toolbox for brushes etc. for his stable, the one with cleaning products was made by grandson no.3 (with a little assistance) for his kitchen.  As you can see I'm experimenting with different finishes.

28.4.10

Buttons Makes his Debut

A new card reader has been obtained, Yay!!  Thanks goes to my other half for his persistence!  As promised, pics!

This is Buttons.  He is 17mm or 11/16ths" tall (or short, depending on your perspective) and is 5way jointed.  He comes in this little basket. 

And a hint of what 2nd and 3rd winners will receive.

The wooden basket can be painted or left unpainted for the winner to finish themselves.

2.4.10

Happy Easter Friends

Remember the reason, enjoy family time and eat Easter Eggs!


Pssst!  (whispering) I'm miniature crocheting again :)  Couldn't hold out any longer, house settling can wait a little.  What am I making?  Heheh, now that would be giving things away a little too soon............that's right, it's a give away!  Watch this space.

26.3.10

Weight Loss Program

Guaranteed to lose 10lb in 4 weeks!  Just pack up your entire house, move out and then move back in again!! 

With life so disorganised miniature crochet is but a memory but I'll share my last larger project that was made in January.  It was a birthday gift so it couldn't be shown before it was received and I forgot to photograph it myself!!  the recipient has kindly sent a couple of photos for me to share.


The gown and petticoat are made from a Doris Thurlow pattern,
resized for finer thread and a finer hook than is used in the original,
the bonnet, bootees and knickers are my own design.


This is the same pattern as Emma Rose's christening layette but made a size smaller to fit the Heidi Ott doll.  It isn't my design but I love making this pattern.  I did design the bonnet and the invisible knickers and bootees.

Lastly, welcome to all the lovely new followers here.  I will make a proper welcome soon I promise! 

Also, thankyou so much Lisa, Susan and Norma for sharing awards!!  I'll pick them up when I have another moment for myself at the computer. 

Mini hugs to everyone, back to the salt mines for me ;)

Sus.

24.1.10

Fun with a grandson


Some things a grandson and I made for his kitchen roombox today!

9.1.10

Look who came to live with us!

After much thought, as you'd expect when adopting ;) I finally gave in to my hearts pleading and a little girl named Isabelle Ivy came to be a sister for Emma Rose!
She's a little sweetie.  A small ray of sunshine in a week that could have been better! 

Feeling a trifle under the weather (battered in spirit after losing one of my dear dogs and bruised in flesh from a fall) the arrival of Isabelle Ivy brought a smile and brightened things up no end!  Aren't miniatures and miniature friends the best balm for the spirits?

7.1.10

Make a pie tin

I am not a poly clay artist, the practical rather than the beautiful comes easier.  This pie dish is easy enough for anyone to make.

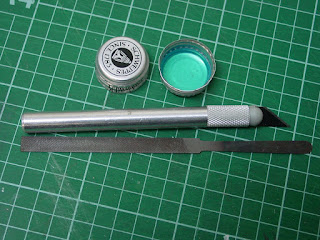
My grandson helped, they are his hands in the photos.  The pics are fairly much self explanatory, simple tools and aluminium tops from drink bottles are all you need.


Cut along the dotted line!


Pull out the insert.  Fold the edge down a little with smooth nosed pliers.


File the edge down to a 'pie dish' depth.


Smooth the top and Voila!


Cook a yummy pie in your new pie dish.  Don't look too closely, I'm not a poly clay artist!


4.1.10

Miniatures take a backseat..........

to "real life" at times. 

Christmas and New Year are big Downunder with long school holidays covering about 6 weeks during the hottest time of the year and many taking their annual work holiday.

Being much better with tools than clay I had Levi assist me with a photo tutorial for making pie dishes - coming soon to this space.  Waaaah!  I'm having photo problems in my computer so can't share the pics in the camera for the moment.

I can share something I began making in late November and had to lay aside during the silly season - two shabby type containers for my pink baby roombox.  They were made using clear plastic pen casing, beads and press studs.  The taller one will hold cotton balls while the short one already holds cotton buds.

If anyone can tell me how to make paint stick to this type of shiny silver bead I would be very grateful, I painted them every which way I could think but every time the paint just came off the minute I touched them.  Gesso helped the paint stick to the press studs but those beads....................frustration!

11.12.09

Begin at the beginning part 2 - or - The On-going Tale of a Miniature Addiction

Having realised I was in fact a miniaturist and part of a wide community rather than believing the love of all things tiny was some sort of personality disorder that needed to be hidden, I proudly came out of the closet with miniature crochet hook in hand in 1976.  Proceeds from miniature crochet bought a scroll saw and a couple of books and I was on my way!  Nothing whatever could be bought at that time, certainly not furniture, not even basswood for the handywoman.   A cabinet maker was co-erced into putting some Heart Totara through his thicknesser and miniature furniture began to fill any moment spared from the demands of real life.

The following year brought with it the opportunity to go to night classes in joinery to build a 3 storey Georgian style dollhouse to  house the growing collection of furniture I'd been slowly making.  Unfortunately that dollhouse had to be left behind when life brought me home to Australia but all the "doings" came along and waited patiently for a new dollhouse home.  Patiently.................

Real life took some twists and turns so, unable to build another dollhouse myself, a friend entered into an agreement to build one for me - a tall narrow house along the lines of a Paddington Terrace house but with a balcony at the top.  Great excitement about 2 years ago when it arrived.
Patience?  it only took 30 years to replace that first dollhouse and worth the wait I might add.


The equestrian chap holding the shotgun is visiting while he waits for his new home in a stable.


29.11.09

Shabby but not too chic............

Grandson came over and we played with knives! 
We think the loose box needs to be 1" wider but apart from that we're happy with the mock up, we'll use mdf and ply for the stable proper.  The front fence will be uprights in the finished stable so the horse can't get his foot over a rail ;)


9.11.09

More doodling.

Not sure which size block to use.........probably need to make more of the larger one to get an idea of overall look.  The small block would be good for an afghan but may be too much for a whole spread.  Either way there are a good few hours of work ahead.


A conservative estimate of the time involved for this more formal spread would be in the region of 120 hours.
This photo is part of a roombox I filled for a miniature crochet display.  The bed usually lives in my dollhouse and Emma Rose has her own roombox.

8.11.09

Doodling.....

A bedspread is needed for the single bed in the dollhouse..........last nights doodling around with colour and design.

7.11.09

Crochet at last........

Just finished, an Afghan for a friend.  I think I want to do one of these in pastels with shabby white instead of black for myself.